Jointing compounds are rising in popularity every day. Long gone are the days where you would mix your sand and cement, get on your hands and knees and fill each and every gap between your slabs. A wonder-solution has surfaced in the last decade: Jointing Compounds.
But what are they, and when are they appropriate to use?
Jointing Compounds: The Long and Short of it.
A jointing compound is a product that is designed to make the process of filling the gaps between your slabs and 'joining' them together as easy as possible. Back in the day, the only option was to put together a sand and cement mix and individually fill each of the joints in your paving by hand. This was a very long, laborious task which - depending on the size of the area - could take days.
So crafty inventors set out to create a product that would reduce this job into much more manageable project which could be completed in hours. There, jointing compounds were born. These are tubs of compound which, once your patio has been laid, you can simply brush into the gaps between the paving slabs with a wire brush and leave the 'cure' over 24-48 hours without any extra work needed. A job that would have previously taken a whole day was shrunk into a couple of hours.
Originally, the very first jointing compounds consisted of a vacuum packed fine sand which was tipped on to the patio and brushed in dry. The chemicals in the sand meant the compound went rock solid over 24 hours as it was exposed to the air. From here more and more products were tested and developed and we are ultimately left with two main types of jointing compound that dominate the market:
- Single tub brush-in compounds
- Two-part slurry mixes.
Single Tub "Resin-Based" Jointing Compounds
Examples: Joint-IT, EASYJoint.
These are the most popular option. They are similar to the initial product design - they come in a single tub and are incredibly easy to use.
They are 'resin-based' which means that once exposed to the atmosphere, the resin cures and sets hard after 24-48 hours which is what gives the compound it's strength and durability.

Application Method:
- Once the slabs are laid. Soak down the entire area with water using a hose. You cannot use too much - these products work best when there is a lot of water, so make sure the slabs are as damp as possible.
- Tip the bucket of jointing compound out onto the slabs, wetting the compound with the hose as well.
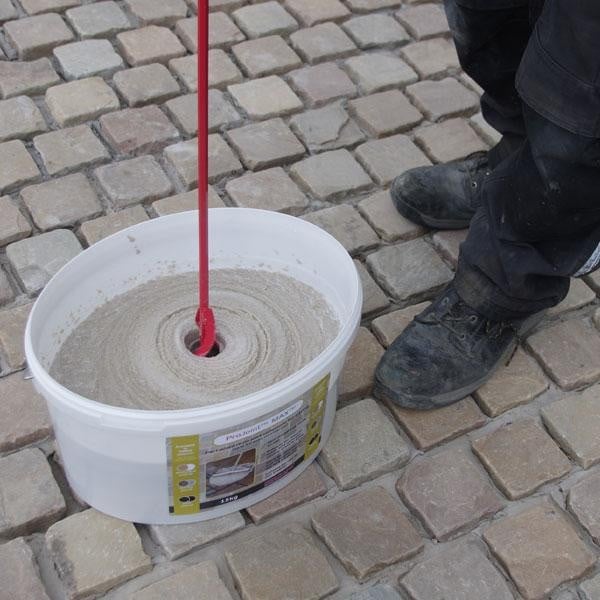
- Simply brush the compound between into the gaps using a wire brush (above). You can use extra water at this stage as well. Using a hose to encourage the last of compound into the gaps is a good idea.
- Allow to cure for 24-48 hours.
That's it!
Pros
- Very easy to apply. Suitable for DIY projects and those in a hurry.
- Range of colours to chose from.
- Won't damage/stain your slabs if plenty of water is used.
- Can apply in the rain.
Cons
- If not enough water is used, excess resin can stain the slabs. Although this will fade over time.
- Not as strong as a two-part compound.
- Heavy traffic can damage the compound if in regular use.
Overall these are a fantastic choice for those looking to wrap up a project with as little friction as possible. They don't require any special training, skills or tools and are incredibly easy to work with.
On top of this, there a wide range of colours so you are bound to find something that suits your project.
Two-Part Mix Jointing Compounds
Examples: Nexus Pro Joint, GTFK.
These are slightly more technical option. They require a little more work to get right, but overall offer a much stronger finish.
They are mixed along with 'hardeners' in the tub they come in, which gives the compound it's setting properties.
Once they have been thoroughly mixed, you then pour them out onto the surface you are jointing up and brush it in, in a similar way to the 'one-tub' solution.
Application Method:
- Liberally wet the paving slabs down.
- Add the 'hardeners' and whisk the compound with a plasterers whisk in its tub for 3 minutes until it comes a 'slurry'.
- Ensure the paving is still wet, especially in hot weather before squeegeeing the slurry in the gaps that require jointing.
- Allow the compound to sit for 10-15 minutes.
- Use a wire brush at a 45 degree angle and sweep any of the excess sand that has remained on the surface - it's important that none of the sand from the slurry remains on the surface of your slabs as they are very likely to stick and stain thanks the the chemical makeup of the compound.
- Allow to cure for 12 hours (foot traffic) or 24 hours (light vehicle traffic).
Pros
- Quicker curing time.
- Strong compound that is even suitable for vehicle traffic.
- Easy to apply slurry.
Cons
- If not cleaned properly, very liable to stains.
- Unsuitable to apply in heavy rain.
- Unsuitable for other types of paving, only natural stone.
Conclusion: Are Jointing Compounds Worth the Hype?
In our opinion, very much so. There are still some die-hards that stick to the old methods of sand & cement, as they know it works. But if you ask us, there is simply no comparison. Sand and cement is by far a cheaper option, but for a little extra expense, the job becomes a much more manageable one. A job that would take all day with the old methods can now be completed in a single afternoon.
With so many options available, no matter the project we are sure you will find a jointing compound that is going to make the job an easier one. And at the end of the day, who doesn't want an easier life!