How to grout and point paving slabs is one of the most heavily discussed topics in the entire landscaping and paving industry. We are part of a few different communities – both online and offline – where this question comes up on almost a daily basis. The debate is always a hot one with lots of people telling their stories on what has worked for them and what hasn’t, and why they think one method is better than another.
I’ve personally read 100’s of comments from dozens of people. There have been moments where two people have been making the exact same point but have still managed to argue with each other about which of their methods was correct - only to realise after a 20-minute exchange that they effectively used the same method. It’s a topic which seems to get people riled up – let me explain why I think this is:
If you have successfully used one method all your life, why would you think there is any other way to do it? And when you are being told regularly that you are doing it ‘wrong’ or that ‘there is a better way to do it’, you are likely to get quite defensive!
Quite simply, I think there are multiple methods that work. There are 2 or 3 ways to go about pointing that you can’t really say is the right or wrong way:
- The Old School Sand & Cement Method
- One-Tub Jointing Compounds
- Two-Part Jointing Compounds
We’ll go through each in turn and highlight the pros and cons of each. There are benefits of each method and plenty of reasons to choose one over the other. Hopefully, we can shed some light on each method, highlight the pros and cons and you can choose for yourself which is the right method for you.
The Old School Method – Sand & Cement
This method has been used for years and still has die-hard supporters who swear it is the only way to go. It is likely still the most popular method as it has been done successfully for years, even with the rise of jointing compounds eating up plenty of the market.
This method requires you to create a patio pointing mix to fill the gaps between your patio slabs. It should be done as soon as possible after the paving has been laid but should only be done on a dry day when there is no chance of rain or frost.
Sand & Cement Application Method:
- Once you’ve mixed your mortar according to a section of our guide here, load some of it onto a trowel and carefully begin to fill the gaps between your slabs. It can help to use a second trowel to slowly slip the mortar into the gaps.
It’s really important to avoid the visible edges of slabs when using the mortar. Cement will stain if it is left on the surface. If you do get some on the face of the slabs, wash it off immediately.
- Pack down the mortar nice and tightly until it is full. Once full, you can ‘strike’ the mortar with a pointing iron to smooth the mortar out. This makes the job look neater, but a flatter joint is also more resistant to frost or water damage.
- It’s important to sweep off any excess mortar nice and quickly to prevent staining. Leave your mortar to dry for around an hour and sweep off any of the excess from the surface of the slabs with a soft-bristled brush. Sweep across the joints, not along the joints as to leave the joints undisturbed. If the mortar in the joints looks as though it has been affected, re-strike the joints to smooth them out again.
- Done! Keep all foot traffic off the patio for at least 48hrs to allow it to cure properly.
Sand & Cement Process Summary:
Beyond mixing the mortar, the process is simple. Put the mortar in the gaps, smooth it with an iron and brush off the excess.
There are no complicated products to learn how to use and people have been having success with this method for decades. It is tried and tested!
Fans of this method declare it as the longest-lasting method out there.
Pros & Cons
Pros: Tried & tested, very durable, incredibly cost-effective.
Cons: Messy, can easily stain slabs, very long-winded and time-consuming.
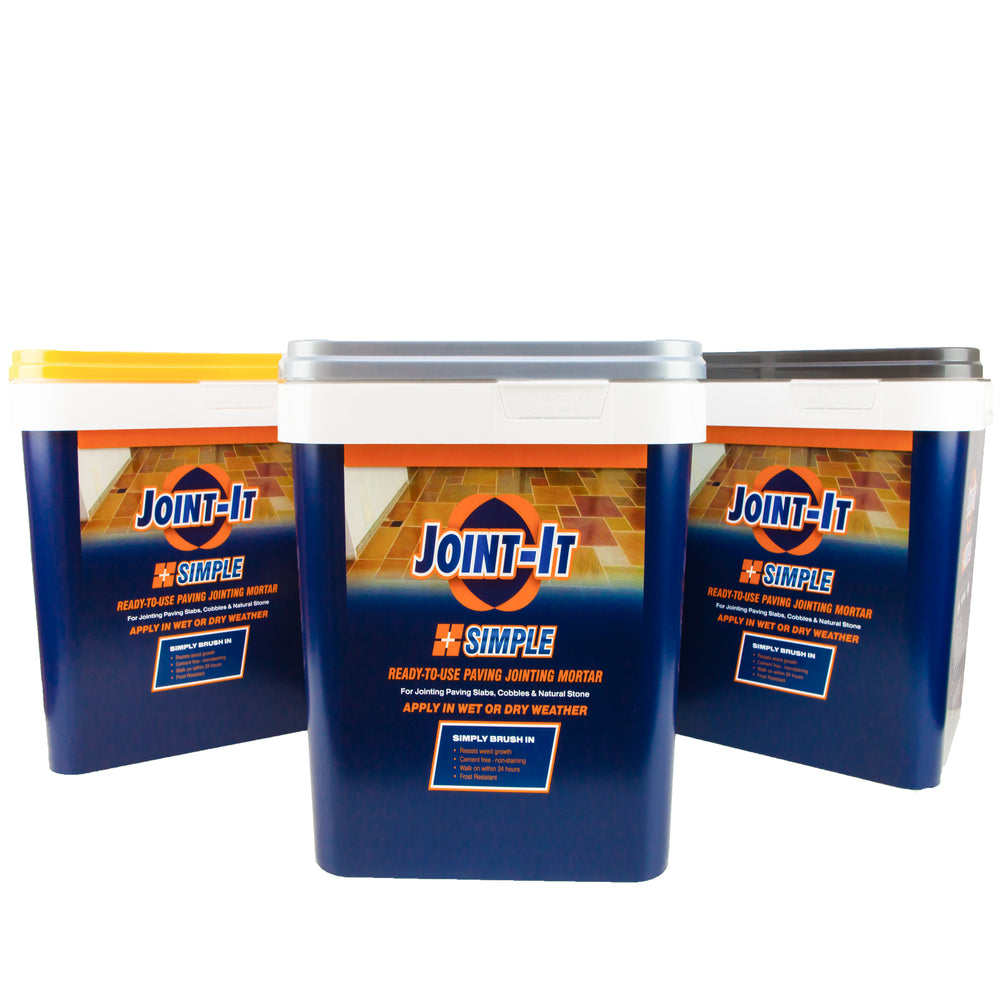
The One Tub Method – Changing the Game
This method has sprung up in the last 10 years and its popularity has exploded with many companies producing their own product in recent years. They combine simplicity with efficiency and began to change what was often an entire day’s work into something that could be done within a couple of hours.
This method gives you a special resin-based jointing compound that’s ready to use regardless of the weather. The method has exploded in popularity thanks to the 365 days a year use and just how quickly you can get a job finished.
One Tub Jointing Compounds - Application Method:
Our personal favourite one-tub compound is JointIT. But there are others available such as EASYJoint which will do a decent job too. Do your research before committing to any one product – but you can’t go wrong with JointIT in our opinion.
- Once your patio is laid, completely wet it down with a hose. One-tub jointing compounds need lots of water to work effectively. They contain resin to help them bind, and without proper saturation with water, the resin can remain on the slabs leaving a noticeable film on the surface. So completely wet the patio, pour the tub out onto the slabs and get this nice and damp too.
- Using a soft-bristled brush or even an XL squeegee, brush the compound into the gaps between the slabs. Ideally adding more water constantly during the process – do not let the area dry.
- Wash the last bits of any remaining compound into the gaps using a hose. Soaking down the entire patio once again.
- Allow the patio to dry – this will take anywhere between 15-45 minutes on a normal day.
- Once dry, sweep off any excess.
One Tub Jointing Compound Process Summary:
A very simple process. No need to get on your hands and knees to accurately fill the joints. Simply sweep the compound into the joints and you’ll be done in a couple of hours.
Definitely, the quickest method to use.
Pros & Cons
Pros: Quick, all-weather with a choice of colours.
Cons: can leave resin stains on slabs if not enough water is used, unfamiliar product to learn.
The Two-Part Method - The Latest Development
This is the priciest option out there. This process requires you to combine a resin binder with an ‘activator’ on-site in a bucket which creates a very strong slurry grout that can be squeegeed into the joints between your slabs.
The slurry is incredibly strong and suitable for large driveways or anywhere open to vehicular traffic. So whilst it is more expensive, it’s a more durable product.
Two-Part Jointing Compound Application Method
There are a few different products that all have their unique methods of mixing. So this is not supposed to be a complete guide on how to use these two-part compounds, more an advisory piece. Make sure you check and follow all manufacturers guides prior to using any of these.
- The purchased compounds will often come in a tub of what looks like a sand filler, along with a separate bottle containing the resin activator.
- All of the liquid in the bottle will need to be added to the filler and mixed with a paddle mixer. Some manufacturers will require additional water to be added, so follow the instructions as required.
- Mix until the resin is mixed completely through the mixer. Some will come with recommended guidelines for minimum mixing times, but usually, it will be somewhere between 2-4 minutes.
- Ideally whilst someone is mixing, a second person will be wetting down the patio. Once the compound is mixed, it only has a limited working time, so the patio should be pre-wetted.
- Pour the mixture onto the pre-wetted area and begin to squeegee it into the gaps. Like one-tub compounds, keep the area wet throughout.
- The compound will settle on its own and will not need any extra smoothing.
- Leave for around 5-10 minutes to allow the compound to settle and begin the cleaning process. Sweep the surface with a soft-bristled brush, moving any of the filler sand that remains on the surface. Throw away any of the excess as it normally cannot be reused.
- Leave to cure for 24 hrs before walking on and 3-5 days before subjecting it to any vehicular traffic.
Two-Part Jointing Compound Process Summary:
This process requires a bit more care and attention. There are a few different options and each set of individual instructions should be followed accordingly. As long as you follow the instructions, not much can go wrong. But there is a bit of a learning curve and extra care should be taken.
The cost of the 2-part solutions are much more than the others, but they are probably the most permanent solution on the market when used correctly.
Pros & Cons
Pros: Very strong, quick to use.
Cons: complicated to learn, pricey, and if not done correctly can permanently ruin a patio.
In Conclusion: There Is No Best Method To Grouting And Pointing Paving Slabs
Putting it simply, there is no right or wrong answer when it comes to choosing your jointing method out of these three options. It all depends on your priorities – is it money-saving or time saving you want? Do you want to save your knees and back from aching?
The lesson to take from this is: Do your research! Hopefully, we will help you get going with this article. But it’s important to know what you want from your choice. If it’s the easiest/quickest option, one-tub is best. If it’s the most cost-effective option, then go for old school sand and cement. If done correctly, all these methods are perfectly suitable!

2 comments
Hi Bill,
All fair suggestions. You’ll find that a 4:1 mix or sand/cement mortar is going to be the strongest, but will be quite a big job to cut out and add it by hand. No-one’s favorite job. But it’s definitely the best option as it will likely be what was done 35 years ago and thats lasted very well!
The jointing compound may not work for you here. Two reasons: it’s not a great match for concrete marshalls style paving slabs – they are more suited for natural paving. Add to that it will be driven on, it’s likely to start coming out of the gaps within a few years. However, it often looks great once done as there are multiple colour options and it’s very easy to do it correctly.
It all comes down to how much effort you’d like to put in, or if you’d prefer to have someone come in to do it for you, then sand and cement option is probably recommended
Many thanks for your excellent and comprehensive article.
In my case I have a drive constructed next to my home comprising of Marshall’s 2 foot square paving slabs – 27 slabs long and 4 wide each slab has a joint approx 1/4” wide.The paving was laid on a wet sand and cement mix and has been down about 35 years.
The mortar mix between the joints is now starting to deteriorate and weeds are taking advantage. I’ve had various advise from the building community :- leave it and put weed killer down it’ll see you out (I’m 79), get an angle grinder and cut out existing mortar to a depth of 1/4 to 1/2” and brush in kiln dried silver sand. Cut out and brush in 4 to 1 mix of sand and cement. Another suggested your favoured method of cutting out and brushing in a jointing compound. The latter seemed to be a good suggestion but I’ve recently been advised that it’s not recommended for drives due to weight of car. I’ve also been told that I would need to know what strength of mix was used in the original mix !
Your thoughts would be appreciated. Bill