It happens from time-to-time. No matter how careful you are with installation, or how professionally your patio may have been installed, paving slabs can come loose. It’s a job that seems small, but it needs to be done properly so that you don’t make the problems worse!
Before we look at how to fix loose paving stones, let’s look at the reason why some paving stones may come loose, which might help us understand how to go about fixing them.
Why Do Paving Stones Become Loose? - A Defective "Sub-Base" Layer
There are a few reasons that can cause a loose paving slab, but the overwhelming amount of the time it comes from a poor foundation. If the slabs are laid on a soft or uneven foundations, then the paving slab will not sit flat and level which creates areas of weakness where the slab or mortar bed isn’t in full contact with the foundation. These areas of weakness are where the slabs are likely to begin to rock and eventually come loose thanks to the extra pressure this creates.
Another common sub-base related reason for wobbly patio stones is that the sub-base layer is too thin and should have been given more consideration before the paved area was laid. The sub-base acts as a load-bearing layer underneath the slabs, so any pressure on the pavers is spread downwards and evenly across this layer to prevent rocking and uneven pressures on the surface. If the base is too thin, then there is not enough depth to re-distribute the pressure very far so the pressure on the surface will be more concentrated on a smaller area of the slabs which can cause them to rock and come loose eventually,
Both the above issues are as a result of the "sub-base" or foundation layer and are very difficult to repair yourself and are next to impossible to fix in a single area without damaging the surrounding sub-base of other slab sections. Unfortunately, this is the most common reason for loose slabs.
However, loose slabs can occur as a result of issues with the "mortar bed" which is the adhesive layer located between the slab and the sub-base. Issues with this area are much easier to solve and will be the focus of the rest of the article.
.jpg)
Why Do Paving Stones Become Loose? - Mortar Bed Issues
The mortar bed is the layer between the sub-base and the paving slabs. This layer is what sticks the slabs down and can sometimes be the culprit for what has caused the paving slab to come loose. It's a much easier element of a patio to deal with!
The slabs may separate entirely from the mortar bed if they were disturbed before being fully set. It may not be noticed immediately while the patio settles and the rest of the adhesion to the mortar is still fresh and strong, but after a few weeks, the weak area where the mortar has separated from the slab can cause uneven pressure across the rest of the tile and the uneven pressure can cause the rest of the slab to rock and come loose.
In general, loose paving slabs as a result of a bad mortar bed are fixable issues, so don't worry too much. The rest of the article will be covering a simple method to remove and replace single paving slabs and re-doing the mortar bed, but if it becomes a recurring problem then it may be worth getting a professional in to take a good look at the sub-base.
Removing Loose Paving Slabs
To fix loose paving stones, first you need to remove the loose paving stones. Even with the loosest paving slabs, it can be very unusual that they can be lifted out by hand. Instead, you will need a hammer and chisel to make the job as simple as possible.
Please Note: It is very important that you remove loose patio slabs carefully, so you don’t damage the loose paving stone or the paving stones around it. You want to keep the cost of the job low and replacing the slab would be costly.
For this step, you will need a selection of tools including:
- Plugging chisel
- Large rubber mallet
- Long handled shovel
Firstly, you need to take your plugging chisel and rubber mallet. Use these tools to carefully chip away the mortar that surrounds the paving stone. Continue chipping around the slab until it becomes completely loose. You may need to chisel out all of the surrounding mortar to fully expose the entire side the paving slab before lifting. Once you can see the full exposed sides of the slabs you are trying to remove, if the slab still doesnt feel lose, you will need to begin chiseling away the mortar from underneath the slab in order to create a gap for you get a shovel underneath.
Once the paving slab is loose, or you have create a nice amount of space undernearth the tile, take your shovel and slide it into the space that has been left by the chisel and mallet work. Wedge the shovel underneath the slab and apply downward pressure to the handle to try and lift the slabs and prise the paver up from the paved area.
It may take a bit of back and forth between the shovel work and the chisel work. If the slab isn't popping up, you may need to chisel away more of the bed, or try to lever from another side before it pops. But if you keep alternating between creating more space, chipping away more mortar and trying to lift the slab with the shovel leverage, then you will eventually get the slab to pop.
.jpg)
Making A New Mortar Bed For Your Loose Slab
Once the loose pavers have been taken out of the patio, it’s time to create a new bed for your paving stones to be re-laid in. To do this, you need to first chip at the old bits of mortar that have been left in the ground. Leaving excess old mortar down will not help anything and is potentially the reason the slabs have come lose in the first place! So be sure remove all mortar that you can see where the slab used to be.
You’ll need a selection of tools for making the new bed for your patio stones to be laid upon. These tools include:
- Plugging chisel
- Rubber mallet
- Sharp sand
- Cement
- Plastic bucket (the size is dependent on the amount of mortar you need to make),
- Electric drill with a paddle mixer attachment
- Large trowel
- Spirit level
Be very careful not to damage the aggregate beneath - as we mentioned earlier, it may well the foundation that has caused the issue, but this is often a big fix that needs a professional to correct, so you will need to leave it undisturbed. Here we are focusing on repairing the mortar bed which is a simpler fix that you can do yourself. Very gently use the plugging chisel and rubber mallet to remove the old mortar from the bed.
Once the old mortar is removed you need to mix the new mortar. We've written a complete article that covers how to create the best mortar for you to use here, so have a good read of this. But in general, scoop 4-6 trowels of sharp sand for every 1 trowel of cement in a large bucket. Use your paddle mixer attachment on the electric drill to combine this mix along with 4 parts water: 4 parts water for every 1 part combined sand and cement mix.
Now, take your trowel to apply a level of mortar onto the aggregate base. You need to ensure that you use enough mortar to be able to create a solid bond with the paver when tapping the slab down into the mortar. The method you are using here is a "full wet bed" method for the mortar bed. Ideally you want to use a solid 60mm of mortar across the entire area you are placing the slab. This then allows you to tap the slab down into the wet bed to ensure it is nice and even across the entire surface - minimizing the risk of the slabs coming loose again.
Relaying The Loose Paving Slabs For A Longer Lifespan
The mortar bed has been made, all that is left is to put the paving stones in place. However, it isn’t quite as easy as just popping the paving slabs in place and expecting it to bed down, there are a couple of extra steps you can take ensure the slab is in full contact with the bed.
Carefully place the slab into the gap onto the full wet bed, ensuring you have left a gap of 10mm around every edge when using a natural stone. Once the slab is roughly in place, you will need to use a rubber mallet to tap the slab across the entire surface to make sure it is fully pressed into the mortar bed. Tap up and down, tap along every edge, diagonal, longways, sideways, crossways... you name it. Give nice firm taps to every single inch of the slab to make sure it is fully in contact with the mortar bed at every single point.
Then take out your spirit level and ensure the slab is level. Place it across the entire surface and check the whole slab is level. If the slab is higher on one side than another, then you will have the same uneven pressure being caused across the slab that may have caused it to come loose in the first place. So check mutiple places and angles across the slab to check that it is as level as you possibly can. Also, check the slab is level with the slab next to it. Place half the spirit level across the newly laid slab and half across an adjacent slab and ensure the two are level. Again, having slabs that are level allows pressure to be spread evenly when stepping across multiple slabs.
The Final Step - Filling The Gaps
You then need to leave the mortar beneath the slab to set. This will take around 24 hours. Check the weather, if it looks like it may rain then cover the slab with a plastic sheet.
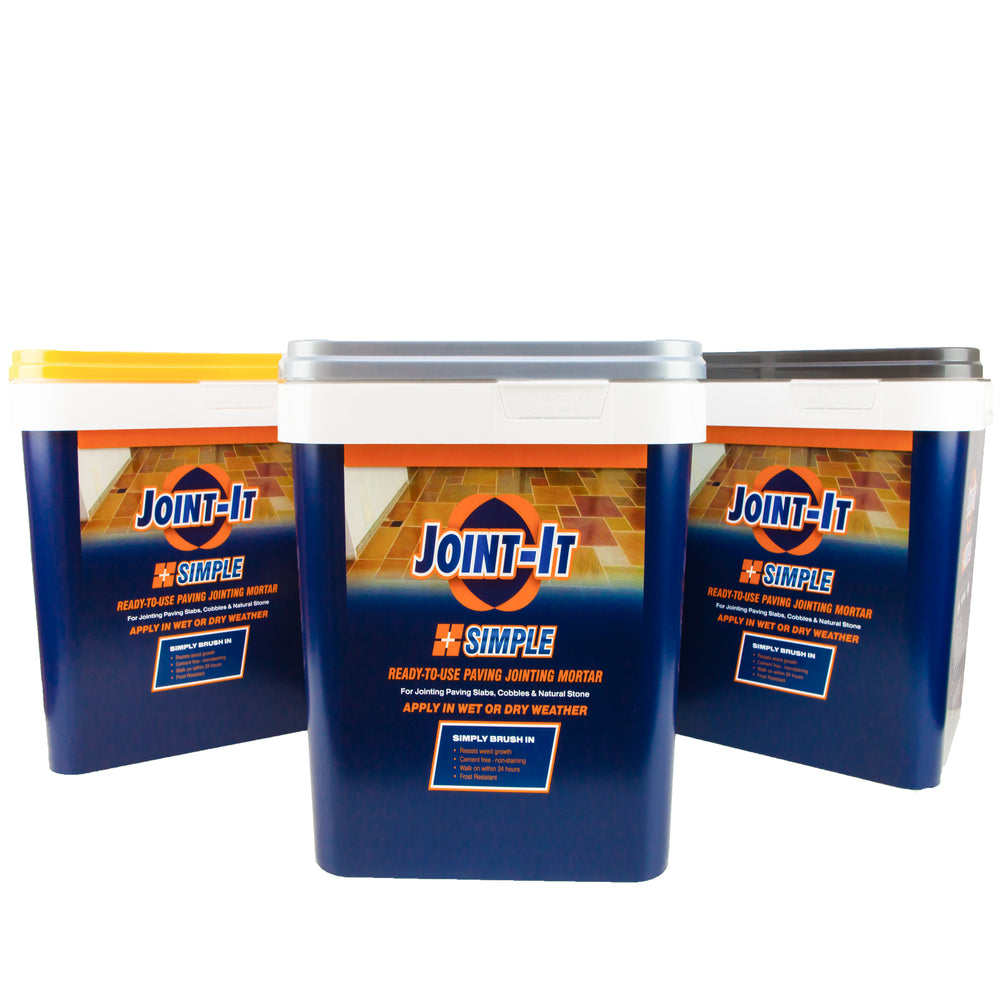
Once you have waited 24 hours you can point the patio up - pointing is the act of filling the gaps between the slabs. You can do this with the same mortar you used for the mortar bed, but you can also use a ready-mixed, resin-based pointing compound such as joint-it simple, which will make the job incredibly easy.
Once the gaps are filled take your stiff-bristled brush and remove any excess mortar or jointing compound from the surface. If you are finding it hard to remove the mortar mix, you might want to use a wet sponge as this can help remove excess mortar.
.jpg)
If your paving stones become damaged or you need anymore help, call our team. We will happily answer any queries you might have and supply you with any additional paving stones you might need.